Arm Virtual Hardware deployment
Run the safety island firmware on a simulated Cortex-R82 board hosted by Arm Virtual Hardware (AVH), connected over a VPN to an Autoware main-compute stack running on AWS EC2.
This guide assumes you have already built zephyr.elf per the
Quickstart. If you only want to run the firmware locally on the FVP,
stop after the quickstart — you do not need this page.
Note
All command examples on this page can be copied with the copy button in the HTML build. In the PDF build, wrapped lines include trailing line continuation characters — copy with care.
1. Launch the AVH instance
You can bring up the simulated board through the Corellium web UI or via
the avh.py helper script included in this repository. The script is
the recommended path because it drives the same API that the web UI does
and is scriptable.
Configure credentials
Copy template.env to .env at the repository root and fill in:
AVH_API_ENDPOINT— leave as-is for staging, or change tohttps://app.avh.arm.com/api(or your production endpoint).AVH_API_TOKEN— from the Corellium dashboard → profile / api.AVH_PROJECT_NAME— the project name as it appears in the dashboard.AVH_INSTANCE_NAME— any name; the script creates it if it does not exist.AVH_INSTANCE_FLAVOR— leave asaem8r64-lan9c111. The firmware is specifically built for this flavor.
Deploy with the script (recommended)
From inside the development container:
$ ./avh.py --deploy --ssh
This authenticates, creates or finds the instance, uploads
build/actuation_module/zephyr/zephyr.elf, reboots the instance, and
streams the console over SSH until you disconnect.
Deploy via the web UI
Follow the Arm Virtual Hardware User Guide
to create an account, then create a Cortex®-R82 device with LAN91C111
networking. Upload zephyr.elf as the custom firmware and start the
device. See Upload Firmware in Web UI
for the detailed steps.
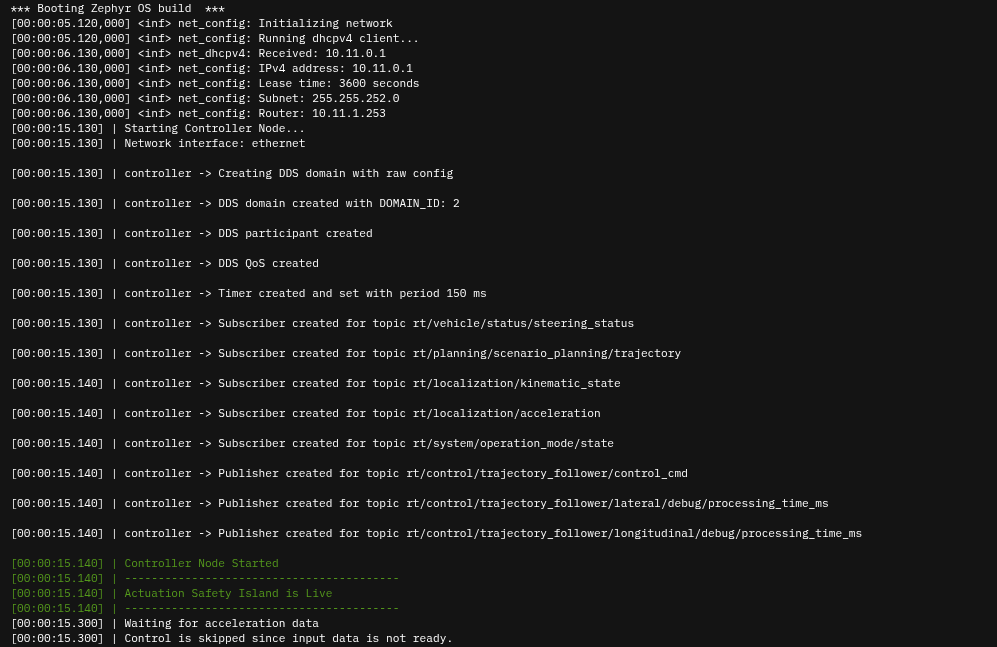
Boot output looks like this:
2. Launch the Autoware main compute on EC2
If you do not already have an AWS account, follow the Create Your AWS Account tutorial. The Launch an instance using the new launch instance wizard page walks through creating the instance itself.
Launch an EC2 instance with:
Ubuntu Server 22.04 on 64-bit Arm (
m7g.2xlarge, Graviton 3, 8 vCPU / 16 GiB RAM).A key pair you can SSH with.
Auto-assign public IP enabled and SSH allowed from a sensible source range.
32 GiB of gp3 storage.
SSH into the instance (see Connect to your Linux instance using an SSH client) and install Docker Engine using the official Install Docker Engine instructions.
Copy the repository onto the EC2 instance (SCP or git clone). The rest
of this guide assumes it lives at ~/autoware-safety-island.
3. Connect the VPN
Autoware on EC2 and the safety island on AVH exchange DDS traffic over a VPN tunnel. Corellium provides an OpenVPN configuration file per device.
Using the script
From inside the devcontainer on EC2:
$ ./avh.py --vpn-connect
Verify the tunnel came up:
$ ip a
You should see a tap0 interface.
Manual setup
On the AVH website, open the Connect tab for your device and click
Download OVPN File. SCP the file to the EC2 instance (see
Transfer files to Linux instances using an SCP client).
The snippet below assumes the file lives at ~/avh.ovpn:
$ sudo apt update
$ sudo apt install --no-install-recommends openvpn
$ sudo -b openvpn --config ~/avh.ovpn
The tail of the output should read:
[...] TUN/TAP device tap0 opened
[...] net_iface_mtu_set: mtu 1500 for tap0
[...] net_iface_up: set tap0 up
[...] net_addr_v4_add: X.X.X.X/X dev tap0
[...] Initialization Sequence Completed
Warning
If the interface name is not tap0, update
demo/cyclonedds.xml to match. See Troubleshooting.
4. Start Autoware
From the EC2 instance:
$ cd ~/autoware-safety-island/demo
$ docker compose up
This brings up three services:
safety-island-autoware— Autoware Universe planning simulator (ROS domain 1).safety-island-bridge— domain bridge that forwards the topics listed in DDS topics between domain 1 (Autoware) and domain 2 (safety island).safety-island-visualizer— noVNC-wrapped RViz instance exposed on port 6080.
Traffic now flows: Autoware (EC2, domain 1) ↔ bridge ↔ VPN ↔ safety island (AVH, domain 2).
5. Drive the simulation
Open the visualizer at
http://<ec2-instance-public-ip>:6080/vnc.html?resize=scale&password=openadkit&autoconnect=true. (The same URL is printed in the container logs at startup.)Click 2D Pose Estimate to place the ego vehicle.
Click 2D Goal Pose to set a destination.
In the Operation Mode tab, click Auto.
The safety island receives the resulting trajectory, runs MPC + PID, and publishes control commands back to Autoware. The planning-simulator tutorial in the Autoware documentation covers more scenarios.
If anything misbehaves — discovery stalls, DDS drops, VPN interface name — see Troubleshooting.