tier4_automatic_goal_rviz_plugin#
Purpose#
-
Defining a
GoalsListby adding goals usingRvizTool(Pose on the map). -
Automatic execution of the created
GoalsListfrom the selected goal - it can be stopped and restarted. -
Looping the current
GoalsList. -
Saving achieved goals to a file.
-
Plan the route to one (single) selected goal and starting that route - it can be stopped and restarted.
-
Remove any goal from the list or clear the current route.
-
Save the current
GoalsListto a file and load the list from the file. -
The application enables/disables access to options depending on the current state.
-
The saved
GoalsListcan be executed without using a plugin - using a nodeautomatic_goal_sender.
Inputs / Outputs#
Input#
| Name | Type | Description |
|---|---|---|
/api/operation_mode/state |
autoware_adapi_v1_msgs::msg::OperationModeState |
The topic represents the state of operation mode |
/api/routing/state |
autoware_adapi_v1_msgs::msg::RouteState |
The topic represents the state of route |
/rviz2/automatic_goal/goal |
geometry_msgs::msgs::PoseStamped |
The topic for adding goals to GoalsList |
Output#
| Name | Type | Description |
|---|---|---|
/api/operation_mode/change_to_autonomous |
autoware_adapi_v1_msgs::srv::ChangeOperationMode |
The service to change operation mode to autonomous |
/api/operation_mode/change_to_stop |
autoware_adapi_v1_msgs::srv::ChangeOperationMode |
The service to change operation mode to stop |
/api/routing/set_route_points |
autoware_adapi_v1_msgs::srv::SetRoutePoints |
The service to set route |
/api/routing/clear_route |
autoware_adapi_v1_msgs::srv::ClearRoute |
The service to clear route state |
/rviz2/automatic_goal/markers |
visualization_msgs::msg::MarkerArray |
The topic to visualize goals as rviz markers |
HowToUse#
-
Start rviz and select panels/Add new panel.
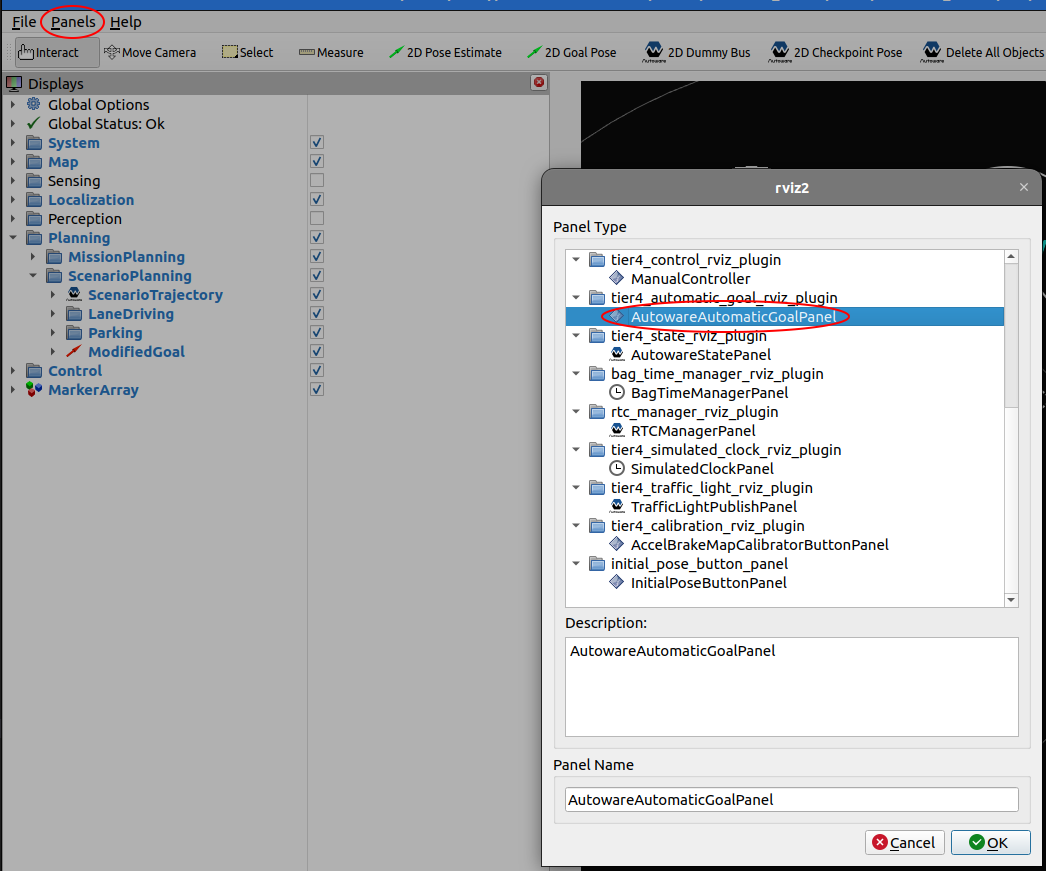
-
Select
tier4_automatic_goal_rviz_plugin/AutowareAutomaticGoalPaneland press OK. -
Select Add a new tool.
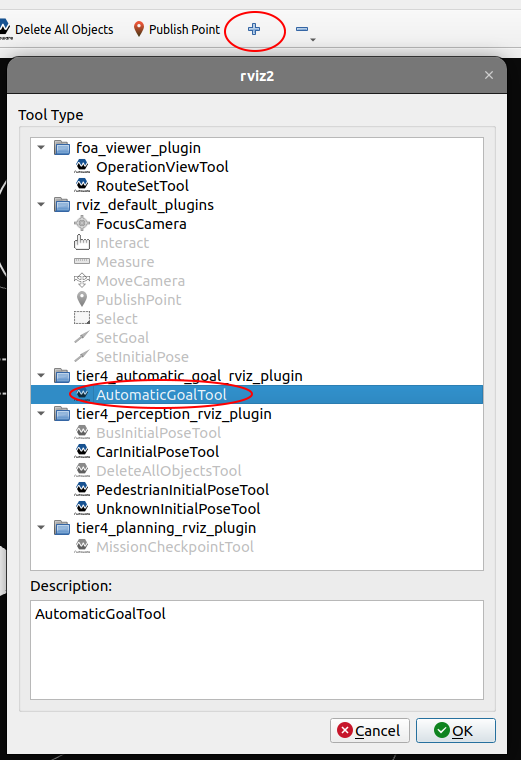
-
Select
tier4_automatic_goal_rviz_plugin/AutowareAutomaticGoalTooland press OK. -
Add goals visualization as markers to
Displays.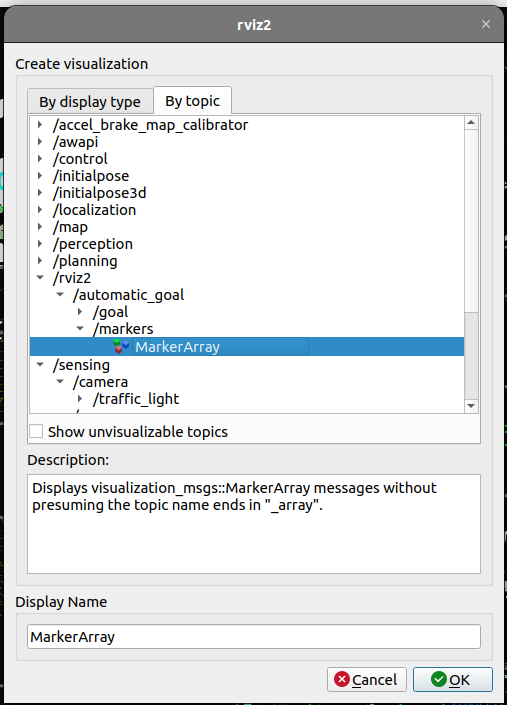
-
Append goals to the
GoalsListto be achieved using2D Append Goal- in such a way that routes can be planned. -
Start sequential planning and goal achievement by clicking
Send goals automatically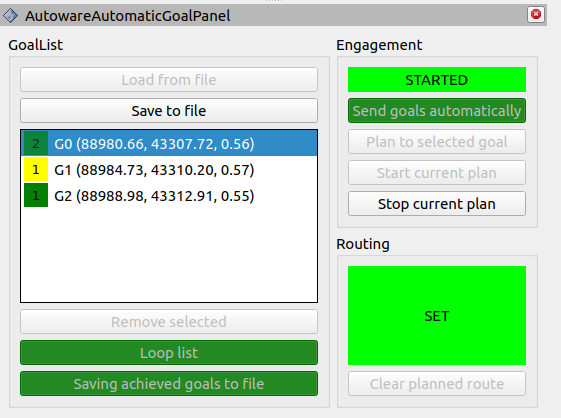
-
You can save
GoalsListby clickingSave to file. -
After saving, you can run the
GoalsListwithout using a plugin also:- example:
ros2 launch tier4_automatic_goal_rviz_plugin automatic_goal_sender.launch.xml goals_list_file_path:="/tmp/goals_list.yaml" goals_achieved_dir_path:="/tmp/"goals_list_file_path- is the path to the savedGoalsListfile to be loadedgoals_achieved_dir_path- is the path to the directory where the filegoals_achieved.logwill be created and the achieved goals will be written to it
- example:
Hints#
If the application (Engagement) goes into ERROR mode (usually returns to EDITING later), it means that one of the services returned a calling error (code!=0).
In this situation, check the terminal output for more information.
- Often it is enough to try again.
- Sometimes a clearing of the current route is required before retrying.
Material Design Icons#
This project uses Material Design Icons by Google. These icons are used under the terms of the Apache License, Version 2.0.
Material Design Icons are a collection of symbols provided by Google that are used to enhance the user interface of applications, websites, and other digital products.
License#
The Material Design Icons are licensed under the Apache License, Version 2.0. You may obtain a copy of the License at:
http://www.apache.org/licenses/LICENSE-2.0
Unless required by applicable law or agreed to in writing, software distributed under the License is distributed on an "AS IS" BASIS, WITHOUT WARRANTIES OR CONDITIONS OF ANY KIND, either express or implied. See the License for the specific language governing permissions and limitations under the License.
Acknowledgments#
We would like to express our gratitude to Google for making these icons available to the community, helping developers and designers enhance the visual appeal and user experience of their projects.