tier4_logging_level_configure_rviz_plugin#
This package provides an rviz_plugin that can easily change the logger level of each node.
This plugin dispatches services to the "logger name" associated with "nodes" specified in YAML, adjusting the logger level.
Warning
It is highly recommended to use this plugin when you're attempting to print any debug information. Furthermore, it is strongly advised to avoid using the logging level INFO, as it might flood the terminal with your information, potentially causing other useful information to be missed.
Note
To add your logger to the list, simply include the node_name and logger_name in the logger_config.yaml under the corresponding component or module. If the relevant component or module is not listed, you may add them yourself.
Note
As of November 2023, in ROS 2 Humble, users are required to initiate a service server in the node to use this feature. (This might be integrated into ROS standards in the future.) For easy service server generation, you can use the LoggerLevelConfigure utility.
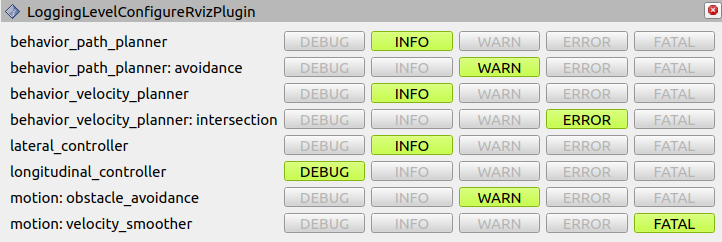
How to use the plugin#
In RVIZ2, go to Panels and add LoggingLevelConfigureRVizPlugin. Then, search for the node you're interested in and select the corresponding logging level to print the logs.
How to add or find your logger name#
Because there are no available ROS 2 CLI commands to list loggers, there isn't a straightforward way to check your logger name. Additionally, the following assumes that you already know which node you're working with.
For logger as a class member variable#
If your class doesn't have an rclcpp::Logger member variable, you can start by including one yourself:
mutable rclcpp::Logger logger_;
If your node already has a logger, it should, under normal circumstances, be similar to the node's name.
For instance, if the node name is /some_component/some_node/node_child, the logger_name would be some_component.some_node.node_child.
Should your log not print as expected, one approach is to initially set your logging level in the code to info, like so:
RCLCPP_INFO(logger_, "Print something here.");
This will result in something like the following being printed in the terminal:
[component_container_mt-36] [INFO 1711949149.735437551] [logger_name]: Print something here. (func() at /path/to/code:line_number)
Afterward, you can simply copy the logger_name.
Warning
Remember to revert your code to the appropriate logging level after testing.
RCLCPP_DEBUG(logger_, "Print something here.");
For libraries#
When dealing with libraries, such as utility functions, you may need to add the logger manually. Here's an example:
RCLCPP_WARN(
  rclcpp::get_logger("some_component").get_child("some_child").get_child("some_child2"),
      "Print something here.");
In this scenario, the logger_name would be some_component.some_child.some_child2.