traffic_light_classifier#
Purpose#
traffic_light_classifier is a package for classifying traffic light labels using cropped image around a traffic light. This package has two classifier models: cnn_classifier and hsv_classifier.
Inner-workings / Algorithms#
cnn_classifier#
Traffic light labels are classified by EfficientNet-b1 or MobileNet-v2.
Totally 83400 (58600 for training, 14800 for evaluation and 10000 for test) TIER IV internal images of Japanese traffic lights were used for fine-tuning.
The information of the models is listed here:
| Name | Input Size | Test Accuracy |
|---|---|---|
| EfficientNet-b1 | 128 x 128 | 99.76% |
| MobileNet-v2 | 224 x 224 | 99.81% |
hsv_classifier#
Traffic light colors (green, yellow and red) are classified in HSV model.
About Label#
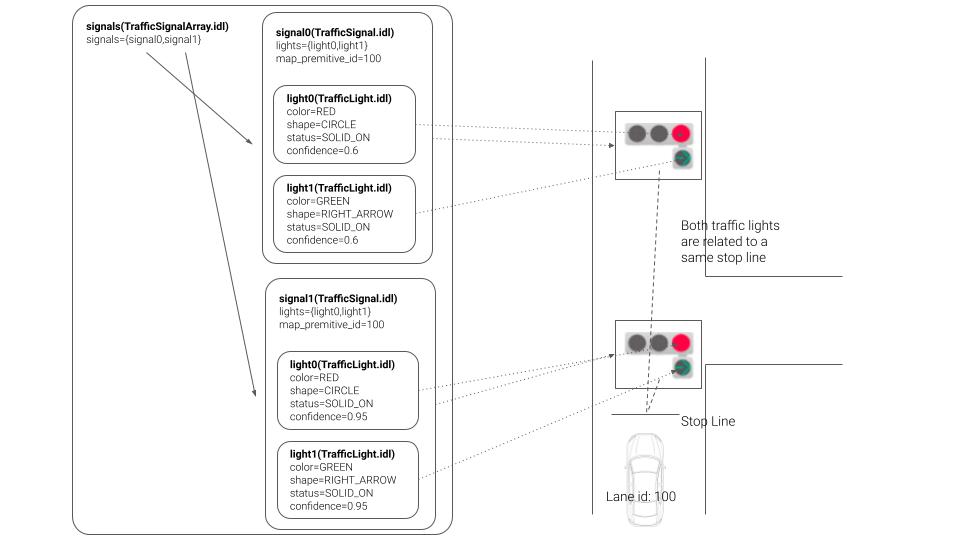
The message type is designed to comply with the unified road signs proposed at the Vienna Convention. This idea has been also proposed in Autoware.Auto.
There are rules for naming labels that nodes receive. One traffic light is represented by the following character string separated by commas. color1-shape1, color2-shape2 .
For example, the simple red and red cross traffic light label must be expressed as "red-circle, red-cross".
These colors and shapes are assigned to the message as follows:
Inputs / Outputs#
Input#
| Name | Type | Description |
|---|---|---|
~/input/image |
sensor_msgs::msg::Image |
input image |
~/input/rois |
tier4_perception_msgs::msg::TrafficLightRoiArray |
rois of traffic lights |
Output#
| Name | Type | Description |
|---|---|---|
~/output/traffic_signals |
tier4_perception_msgs::msg::TrafficLightArray |
classified signals |
~/output/debug/image |
sensor_msgs::msg::Image |
image for debugging |
Parameters#
Node Parameters#
| Name | Type | Description |
|---|---|---|
classifier_type |
int | if the value is 1, cnn_classifier is used |
data_path |
str | packages data and artifacts directory path |
backlight_threshold |
float | If the intensity get grater than this overwrite with UNKNOWN in corresponding RoI. Note that, if the value is much higher, the node only overwrites in the harsher backlight situations. Therefore, If you wouldn't like to use this feature set this value to 1.0. The value can be [0.0, 1.0]. The confidence of overwritten signal is set to 0.0. |
Core Parameters#
cnn_classifier#
| Name | Type | Description |
|---|---|---|
classifier_label_path |
str | path to the model file |
classifier_model_path |
str | path to the label file |
classifier_precision |
str | TensorRT precision, fp16 or int8 |
classifier_mean |
vector\ |
3-channel input image mean |
classifier_std |
vector\ |
3-channel input image std |
apply_softmax |
bool | whether or not apply softmax |
hsv_classifier#
| Name | Type | Description |
|---|---|---|
green_min_h |
int | the minimum hue of green color |
green_min_s |
int | the minimum saturation of green color |
green_min_v |
int | the minimum value (brightness) of green color |
green_max_h |
int | the maximum hue of green color |
green_max_s |
int | the maximum saturation of green color |
green_max_v |
int | the maximum value (brightness) of green color |
yellow_min_h |
int | the minimum hue of yellow color |
yellow_min_s |
int | the minimum saturation of yellow color |
yellow_min_v |
int | the minimum value (brightness) of yellow color |
yellow_max_h |
int | the maximum hue of yellow color |
yellow_max_s |
int | the maximum saturation of yellow color |
yellow_max_v |
int | the maximum value (brightness) of yellow color |
red_min_h |
int | the minimum hue of red color |
red_min_s |
int | the minimum saturation of red color |
red_min_v |
int | the minimum value (brightness) of red color |
red_max_h |
int | the maximum hue of red color |
red_max_s |
int | the maximum saturation of red color |
red_max_v |
int | the maximum value (brightness) of red color |
Training Traffic Light Classifier Model#
Overview#
This guide provides detailed instructions on training a traffic light classifier model using the mmlab/mmpretrain repository and deploying it using mmlab/mmdeploy. If you wish to create a custom traffic light classifier model with your own dataset, please follow the steps outlined below.
Data Preparation#
Use Sample Dataset#
Autoware offers a sample dataset that illustrates the training procedures for traffic light classification. This dataset comprises 1045 images categorized into red, green, and yellow labels. To utilize this sample dataset, please download it from link and extract it to a designated folder of your choice.
Use Your Custom Dataset#
To train a traffic light classifier, adopt a structured subfolder format where each subfolder represents a distinct class. Below is an illustrative dataset structure example;
DATASET_ROOT
    ├── TRAIN
    │    ├── RED
    │    │   ├── 001.png
    │    │   ├── 002.png
    │    │   └── ...
    │    │
    │    ├── GREEN
    │    │    ├── 001.png
    │    │    ├── 002.png
    │    │    └──...
    │    │
    │    ├── YELLOW
    │    │    ├── 001.png
    │    │    ├── 002.png
    │    │    └──...
    │    └── ...
    │
    ├── VAL
    │       └──...
    │
    │
    └── TEST
           └── ...
Installation#
Prerequisites#
Step 1. Download and install Miniconda from the official website.
Step 2. Create a conda virtual environment and activate it
conda create --name tl-classifier python=3.8 -y
conda activate tl-classifier
Step 3. Install PyTorch
Please ensure you have PyTorch installed, compatible with CUDA 11.6, as it is a requirement for current Autoware
conda install pytorch==1.13.1 torchvision==0.14.1 pytorch-cuda=11.6 -c pytorch -c nvidia
Install mmlab/mmpretrain#
Step 1. Install mmpretrain from source
cd ~/
git clone https://github.com/open-mmlab/mmpretrain.git
cd mmpretrain
pip install -U openmim && mim install -e .
Training#
MMPretrain offers a training script that is controlled through a configuration file. Leveraging an inheritance design pattern, you can effortlessly tailor the training script using Python files as configuration files.
In the example, we demonstrate the training steps on the MobileNetV2 model, but you have the flexibility to employ alternative classification models such as EfficientNetV2, EfficientNetV3, ResNet, and more.
Create a config file#
Generate a configuration file for your preferred model within the configs folder
touch ~/mmpretrain/configs/mobilenet_v2/mobilenet-v2_8xb32_custom.py
Open the configuration file in your preferred text editor and make a copy of the provided content. Adjust the data_root variable to match the path of your dataset. You are welcome to customize the configuration parameters for the model, dataset, and scheduler to suit your preferences
# Inherit model, schedule and default_runtime from base model
_base_ = [
    '../_base_/models/mobilenet_v2_1x.py',
    '../_base_/schedules/imagenet_bs256_epochstep.py',
    '../_base_/default_runtime.py'
]

# Set the number of classes to the model
# You can also change other model parameters here
# For detailed descriptions of model parameters, please refer to link below
# (Customize model)[https://mmpretrain.readthedocs.io/en/latest/advanced_guides/modules.html]
model = dict(head=dict(num_classes=3, topk=(1, 3)))

# Set max epochs and validation interval
train_cfg = dict(by_epoch=True, max_epochs=50, val_interval=5)

# Set optimizer and lr scheduler
optim_wrapper = dict(
    optimizer=dict(type='SGD', lr=0.001, momentum=0.9))
param_scheduler = dict(type='StepLR', by_epoch=True, step_size=1, gamma=0.98)

dataset_type = 'CustomDataset'
data_root = "/PATH/OF/YOUR/DATASET"

# Customize data preprocessing and dataloader pipeline for training set
# These parameters calculated for the sample dataset
data_preprocessor = dict(
    mean=[0.2888 * 256, 0.2570 * 256, 0.2329 * 256],
    std=[0.2106 * 256, 0.2037 * 256, 0.1864 * 256],
    num_classes=3,
    to_rgb=True,
)

# Customize data preprocessing and dataloader pipeline for train set
# For detailed descriptions of data pipeline, please refer to link below
# (Customize data pipeline)[https://mmpretrain.readthedocs.io/en/latest/advanced_guides/pipeline.html]
train_pipeline = [
    dict(type='LoadImageFromFile'),
    dict(type='Resize', scale=224),
    dict(type='RandomFlip', prob=0.5, direction='horizontal'),
    dict(type='PackInputs'),
]
train_dataloader = dict(
    dataset=dict(
        type=dataset_type,
        data_root=data_root,
        ann_file='',
        data_prefix='train',
        with_label=True,
        pipeline=train_pipeline,
    ),
    num_workers=8,
    batch_size=32,
    sampler=dict(type='DefaultSampler', shuffle=True)
)

# Customize data preprocessing and dataloader pipeline for test set
test_pipeline = [
    dict(type='LoadImageFromFile'),
    dict(type='Resize', scale=224),
    dict(type='PackInputs'),
]

# Customize data preprocessing and dataloader pipeline for validation set
val_cfg = dict()
val_dataloader = dict(
    dataset=dict(
        type=dataset_type,
        data_root=data_root,
        ann_file='',
        data_prefix='val',
        with_label=True,
        pipeline=test_pipeline,
    ),
    num_workers=8,
    batch_size=32,
    sampler=dict(type='DefaultSampler', shuffle=True)
)

val_evaluator = dict(topk=(1, 3,), type='Accuracy')

test_dataloader = val_dataloader
test_evaluator = val_evaluator
Start training#
cd ~/mmpretrain
python tools/train.py configs/mobilenet_v2/mobilenet-v2_8xb32_custom.py
Training logs and weights will be saved in the work_dirs/mobilenet-v2_8xb32_custom folder.
Convert PyTorch model to ONNX model#
Install mmdeploy#
The 'mmdeploy' toolset is designed for deploying your trained model onto various target devices. With its capabilities, you can seamlessly convert PyTorch models into the ONNX format.
# Activate your conda environment
conda activate tl-classifier

# Install mmenigne and mmcv
mim install mmengine
mim install "mmcv>=2.0.0rc2"

# Install mmdeploy
pip install mmdeploy==1.2.0

# Support onnxruntime
pip install mmdeploy-runtime==1.2.0
pip install mmdeploy-runtime-gpu==1.2.0
pip install onnxruntime-gpu==1.8.1

#Clone mmdeploy repository
cd ~/
git clone -b main https://github.com/open-mmlab/mmdeploy.git
Convert PyTorch model to ONNX model#
cd ~/mmdeploy

# Run deploy.py script
# deploy.py script takes 5 main arguments with these order; config file path, train config file path,
# checkpoint file path, demo image path, and work directory path
python tools/deploy.py \
~/mmdeploy/configs/mmpretrain/classification_onnxruntime_static.py\
~/mmpretrain/configs/mobilenet_v2/train_mobilenet_v2.py \
~/mmpretrain/work_dirs/train_mobilenet_v2/epoch_300.pth \
/SAMPLE/IAMGE/DIRECTORY \
--work-dir mmdeploy_model/mobilenet_v2
Converted ONNX model will be saved in the mmdeploy/mmdeploy_model/mobilenet_v2 folder.
After obtaining your onnx model, update parameters defined in the launch file (e.g. model_file_path, label_file_path, input_h, input_w...).
Note that, we only support labels defined in tier4_perception_msgs::msg::TrafficLightElement.
Assumptions / Known limits#
(Optional) Error detection and handling#
(Optional) Performance characterization#
References/External links#
[1] M. Sandler, A. Howard, M. Zhu, A. Zhmoginov and L. Chen, "MobileNetV2: Inverted Residuals and Linear Bottlenecks," 2018 IEEE/CVF Conference on Computer Vision and Pattern Recognition, Salt Lake City, UT, 2018, pp. 4510-4520, doi: 10.1109/CVPR.2018.00474.
[2] Tan, Mingxing, and Quoc Le. "EfficientNet: Rethinking model scaling for convolutional neural networks." International conference on machine learning. PMLR, 2019.